About Me:

I am a professional Pet Groomer. I have been grooming for 28 years. This Blog is a kind of diary of my work. I wish I had started years ago, writing some of the experiences I have had while grooming. Most days are fun, some can be sad, some can be just down right crazy. If you are a pet owner and come across this blog, I hope it helps you understand how your pet is groomed. If you are a Pet Groomer, I hope you can relate to some of the stories. Maybe even learn a grooming tip or can leave a friendly grooming tip for me. There is always something to learn, no matter how long you have been grooming.

Monday, October 31, 2011

A Mustache

I don't get many requests for mustaches on Poodles like when I first started grooming.
Most Poodle owners want one of two faces...shaved clean or full and round.

I have been waiting for a Poodle owner to come in and ask for a mustache so that I could take pictures, but that has not happened.


So, I took one of my Poodle customers that does not come in to often, and used him to show a couple of different mustaches.

Because this dog normally gets a clean face, all of the pictures are on a dirty dog.
After I took the pictures of the different mustaches, I had to clip the face clean.

You will also notice that the face is not saved against the grain on this Poodle, because of how sensitive his skin is.


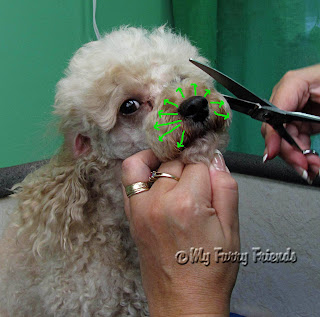
 I'll start with what grooming school called a 'donut mustache'.

This is a mustache that goes all of the way around the muzzle, including the top of the nose.

Clip the face the same way that you would clip a clean face, only leave hair on the front of the muzzle.

Use the corner of the mouth as a guide of where to stop clipping.


 You want to clip out under and between the eyes.

Do not clip the top of the nose. 

Make your line go straight down from the top of the nose to the corner of the lip.


In grooming school I was taught not to expose the corner of the mouth, but I never liked the way the mustache would go out of shape when the dog opened his mouth the pant.

I like to take my thumb and gently pull the corner of the mouth back towards the ear and clip just enough hair to expose the corner of the mouth a little.


This way when the dog opens it's mouth to pant,  the mustache stays in shape.


I wish that I was showing this on a clean dog.

Anyway, after clipping the face, take your comb and pluck up the hair, all of the way around the mouth before you start to scissor.


Start to scissor a round donut shape all of the way around the mouth.

With this mustache you also leave hair on top of the nose.

This dog did not have a lot of hair on the top of the nose to begin with, so I used the length on the top of the nose as a guide to round off the rest of the mustache.


Try to get the shape as round as you can.


This is a view of the 'donut mustache' from the side after it has been shaped.


This is the 'donut mustache finished.

I am sorry that it is not on a clean dog.

This picture does not show it very well.


This mustache is a 'full mustache'.

Can you tell what the difference is from the one above?

The only difference is that the top of the nose has been clipped off and the beard has also been clipped off leaving just the sides of the mustache.


Next is the 'French mustache'.

#1 The top of the nose is shaved off.

#2 The beard is shaved off.

#3 Blend the mustache down from the back corner of the nose to the corner of the mouth. Skim down to lose some of the puffiness at the top of the mustache.

#4 Scissor mustache to lip line. I did have one customer long ago that wanted this type of mustache on his  Poodle, but he wanted me to leave the sides long, hanging down over the lip line.


 This is the French Mustache finished.

You may have noticed that I shaped up the topknot.

Yes, the dog is still dirty.
I couldn't help it.
It was driving me crazy.
I didn't like the way the pictures looked.
Anything was better than the way the topknot looked in the above pictures.

I know...I am crazy.  :)


I do do the 'donut mustache' on other breeds quite often.

This dog gets the sides of her face clipped off with a #4 blade instead of a #15.
I scoop out under the eyes with a #10 because her eyes water very badly.

Then shape up the mustache round.

The mustaches can be as full or as tight as you or the customer wishes.


Happy Grooming, MFF

Saturday, October 29, 2011

So Not Ready...

...for SNOW!


This is what my driveway looked like a few hours ago.

It is still October, right?

My driveway is not supposed to have snow on it yet.


There are still leaves on the tress.

There is actually some color this year.

I was going to take a couple of the dogs to the Falls this weekend to get some Fall pictures.

Fall pictures, not Winter pictures.


Doesn't Mother Nature know that November and December are booked solid.

Doesn't she know I don't have any place to move snow panicked customers around to.

October is not the time for a 'Nor'easter'.


 Plus, I am not ready for the cold weather yet!

...or customers that don't know how to drive in snow.

...or customers who think this dusting is a Blizzard.


Sooo, please Ms. Mother Nature, hold off on the snow... at least until December 26th.


Happy Grooming, MFF

Friday, October 28, 2011

10 Commandments for Grooming Your Pet

Every dog owner should be given this when they get a dog.

I plan to frame this and hang it in my lobby.


The scan did not come out the way I wanted, so I printed it out below.

10 Commandments for Grooming your Pet

~ Start Grooming Me Early...please don't wait until I am 6 months to a year old in your time. in dog years I have already aged 10-16 years old in dog years. I need to be groomed as early as 3 months old so that I can get used to the brushes, clippers and water.

~ Learn How to Brush Me...I see you brush your hair everyday, why not take a minute or two to brush mine too? I like my hair to feel nice also.  I would love the attention.

~ Give Me a  Warm Bath...You take a shower everyday. I would like to feel clean too. I get a lot of attention when I am clean. I also stay happy and healthy when I am well groomed.

~ Don't use the Garden Hose...to give me a bath. I don't want a cold bath. It's not funny when you chase me around the yard. I would like my bath better with nice warm water.

~ Don't put me in a Tub full of Water....
It scares me. I don't want to swim. A nice warm shower will do. Oh, and don't forget to put a mat in the bottom of the tub so I don't feel like I am slipping all over the place.

~Don't Bathe Me With Knots in My Hair....
My knots will not fall out when my hair is clean, they will only get worse and tighter. They will turn onto larger mats. It will hurt even more when you try to get them out.

~ Take Me to a Professional Pet Groomer...
It's okay if you don't want to brush me or wash me. There are many Professional groomers that you could take me to who would love to make me look and feel good.

~Find a Good and Nice Professional Pet Groomer...
I don't want you to take me to just anyone. Find a groomer that will be nice to me and knows what they are doing. You get what you pay for. Would you let just anyone holding scissors cut your hair?

~Don't Wait Until My Hair is all Dirty and Matted...to get me groomed. It really hurts when the knots in my hair pull my skin. Sores fester under those knots and make me feel bad.
They will have to shave all of my hair off. I want to be clean and look nice everyday, just like you.

~ Don't Laugh at Me After I Get a Hair Cut...
most of all don't laugh at me when the groomer has to cut all of my hair off because you did not take the time to take care of me!

                                                                                                              Lisa Kloid
                                                                                                        Professional Pet Groomer

Happy Grooming, MFF


Thursday, October 27, 2011

Bored....

What do you do when you are sitting around at the end of the day waiting for the last dog to be picked up?
Everything is cleaned up, and  you are ready to walk out the door....as soon as the last customer decides to pick up their dog.

I decided to try something that I had seen done on another dog.
It involved an old curling iron that was collecting dust at home, and my toy poodle.


As you can see, my girls ears really long.

I have thought about shortening them every time I groom her, but I can't seem to bring myself to cut them.

So while I was waiting for that last customer of the day to pick up their dog, I plugged in the curling iron.


I took small sections of hair on her ears, and started curling it.


I made sure that the hot iron did not come close to her ear leather.


Wha-la.

Curls!

She looks less than thrilled doesn't she?


 "Really Mom!?" 

"Take the darn picture and brush these darn curls out of my ears."

"I already get teased enough for being a fro-fro dog."


"That's better...back to normal."


Imagine offering this service for all of those Bichon owners who like those long stringy ears on their dogs.  :)

Happy Grooming, MFF

Tuesday, October 25, 2011

Tuesday's Tip # 34 Christmas Bandannas

It's almost here...Christmas!

I can't believe it.
November and December are booked.

Right now is the time to buy Christmas material if you like making bandannas for your customers.
I waited till November last year, and the only material left was too ugly to use.

I used to buy my material from Wal-Mart.
They used to have a nice craft and sewing section, but most of them have closed up.
I do have one Wal-Mart close to work that still has the sewing and craft department, but they don't seem to get the nice material in like they used to.
So, I went to Jo-Ann Fabrics.
Their materials is twice as much as Wal-Marts, but it still costs less for me to make my own bandannas.

They are nothing fancy, but the customers love them.


  I only found four patterns that I like so far.

I like to get one each for the girls and the boys.
Then a few more that could go on both male and female.

I buy 2 to 3 yards of each pattern depending on their price.


I also like to use pinking shears.
It puts a little bit of a fancy edge on the bandanna.


I don't bother with measuring the material.

I lay it out on a large flat surface. (I use my bed)

I leave the material folded the way it comes off of the bolt at the store.

Lay it out and take the corner and bring it down to form an even triangle.


This is easier for me then getting a ruler and measuring out a square.

Now you have the bandanna shape.


Leave the material folded while you make your first cut.


Follow the edge of the folded piece.


This is what it will look like after the first cut.


Once again, keep the material folded, and cut again at the fold.


You now have two folded pieces.

Cut again at the folds.


You now have four large dog bandannas.

You can fold and cut these again to get medium size bandannas.

Fold and cut the medium size to get small dog sizes.


One large dog bandanna will make two medium dog bandannas, and four small dog bandannas.


I make more large and medium size bandannas, because I can always quickly cut a large or medium bandanna down to a smaller one as needed.


Storing these darn things has always been a problem for me.

If I store them in drawer, they start out nice and neat, but after a day of sorting through them for the one I want, they get all messed up in the drawer.

So this year I found a different way to keep them by my table.


For five dollars I bought a skirt organizer.
It has six different sections that I can organize the bandannas on.


I can also slide the clips back and forth to accommodate the size of the bandanna.


I can sort them by size.

I can hang them by my table. 

I can pick the size I want, take off that pile, sort through them, and then clip them back in place.


We'll see how well it works out.

So, if you want to make your own bandannas for Christmas, get out to the store now before all of the pretty material is gone.


Happy Grooming, MFF

Sunday, October 23, 2011

Why?

I need to take a moment of your time.

I want to know if other groomers have the same problem we have been having lately.
It really does not have anything to do with actual grooming.

It does have everything to do with trying not to look like an idiot in front of your customer.

What the heck am I talking about?

Harnesses!!

Yes, I said harnesses.

You know those crazy contraptions that you spend 10 minutes trying to get back on the dog when it is wiggling like crazy to go home.

When I first started grooming, I don't remember ever seeing very many harnesses.
I think owners were using vines then.

Nooo, I am not that old yet.  :)

The first harness that I remember was the H shape harness.
It had one buckle around the neck, and one buckle around the belly.
It was pretty simple to put on.
I do not even see those type anymore.

Do you know why?

Because they were easy to put on.


Next came this type of harness.

It was a fairly easy type of harness also.

You only had to put it over the dogs head, tuck one leg in, and snap it shut.

I used this type of harness for years on two of my small dogs.

This type of harness was around for a long time.

There were some anti-pull harnesses out, but you didn't see them very often.


Now... in the last couple of years, there seems to have been an explosion of different harnesses.

I personally think that there is someone out there thinking up all kinds of different harness contraptions just to be a pain in my bu**.


Some aren't too bad.

This one you just hold one black strap and one blue strap in each hand and slide it over the dogs head.

Then you put the dogs front feet between the black and blue straps.

If you did it right, the fuzzy black straps should come down the front of the chest.

Oh, and remember the square hook thingy needs to be on top of the dogs back.

Got that?
Simple right?


This one, if I remember correctly, is a seat belt harness for the car.

It is fairly easy to put on after you spend 5 minutes getting it situated in your hands before you try to put it on the wiggly dog.


This one...this one looks simple doesn't it?

Well, yes, I will admit that it is simple to snap shut.

The fun aggravating thing about this harness is, that the dog must step in it for you.

Ya right.

You lay it down in front of the dog.
He looks at you thinking to himself "Bahaha, she really thinks I am going to put my two front feet in those to holes."

So you reach froward and place one foot in one hole.
Then you reach for the other foot.
As you put that foot in the other hole, the dog lifts his other foot out.
You do this a couple of times before it dawns on you, just pick up both front feet at the same time and place them in each hole at the same time.

Great right?

Until... you reach down to grab each end of the harness to clip it shut.

The second you take your hands off of the dog to grab the ends, the dog hops back out of the harness.
Estimated times that you have to put the dogs feet in this harness before your fast enough to grab the snaps before  the dog jumps out...100 times.

Estimated time to get this harness on the dog...2 hours.


This harness is similar to the one above.

The trick to putting these on is, to hold one clip end in your hand.
Put the foot that is on the same side you are holding, in that hole.
Bring that side of the harness up, and the snap over that side of the dogs back.
While still using that hand, hold the dog still while you put the other foot in the the other hole with your other hand.

Got that?

Good.
It didn't make a darn bit of sense to me.


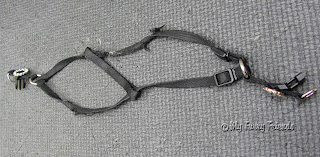
Then there is this one.

This one may look like it is confusing, but it is fairly easy to figure out.
That is if you pay attention when you take it off.

It's one of those harnesses that you look at and think,'good grief.'


But, once you figure it out, you think, 'that wasn't as hard as it looked.'

How does it go on?

The gray part snaps around the neck, and the black snap goes around the belly.

Right?

Right....I think...maybe...


Last but not least.

I am sure that there are more out there.
They just haven't found me yet....but they will.

This harness has been an embarrassment to me.

The first few times a regular customer of ours came in with this harness, we forgot to take note of the way the harness went on the dog.

The first couple of times we took it up to the owner to put back on the dog.
This owner was not happy with us.

So, the next few times we put this harness on the way we thought it was supposed to go, because, of course, we kept forgetting to take note before someone took it off.

Then the time before last, the customer ticked me off a little.

We put the harness on, and I was 99% sure it was right.
When my daughter gave the owner her dog she said, "we're pretty sure we got the harness on right this time."
There was another customer in the lobby at the time.
The owner turned to my other customer and said in a discussed tone, "they never get it on right," and walked out the door.

I know we had it on right that time.
Give me a brake, it is just a harness.
You don't pay me enough for the aggravation of putting a harness back on.

The last time this customer was in I did not let anyone take that darn harness off until I could look at it and make a mental note of how the owner had it on the dog.

That harness was put back on the same way it came off.

I did not say anything to the owner, and the owner did not say anything about the harness to me.

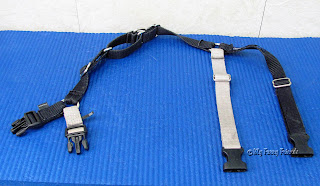
This is another harness that the dog steps into.
The leash hooks in the front, at the chest.
The gray part goes under the belly.
The black snap part snaps over the top of the back.
It is supposed to be an anti-pull harness...not.

I know, I should take all of these harnesses off at drop off and give them back to the owners then and there.

Let the owner bring the harness back with them, and I can watch them put it back on, because I will tell you, I have seen the owners put those darn harnesses on all mixed up also.

Happy Grooming, MFF