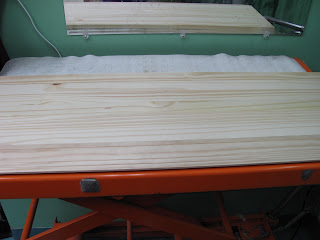
"Your what?", you ask.
Let me explain.
I have back issues.
I have had them since the birth of my daughter.
It is the Anesthesiologist's fault. (Long story)
Anyway, I just can no longer stretch across the grooming table to reach those dogs who love to stand as far away from you as possible.
So, I came up with the idea to make a smaller work area on my grooming table, and bring the dog closer to me.
I cannot tell you how this backboard has saved my back.
I am sure that anyone who as taken the time to look at some of the pictures on my blog, have seen my current backboard that has seen better days.
The structure of the old backboard is holding up.
Cosmetically, not so much.
So, yesterday after work I went to Home Depot and got the supplies for my new backboard.
Even though the other backboard was working fine the way it was, I decided to change the new one up a little.
Why?
Because, I felt like it.
Because, I could.
Because, I just wanted to.
Because, I just can't leave well enough alone.
Supplies:
3- 1"x 12"x 3' Shelf @ $18
(cut one shelf into 2-12"x 12" pieces)
8- 12"x12" floor tiles @ $8
3- Pipe Insulation tubes @ $5
2- 2pk mending Plates @ $9
1- 4pk Large Corner Braces @ $7
2- 4pk Med. Corner Braces @ $9
1- 1"x3' Tapered Molding @ $5
Total: $61
Step 1:
Take one 1"x 12"x 3' shelf and lay it on a flat, firm surface.
Take the tapered molding, and place the 1" edge up against one side edge of the shelf.
Make sure the ends are lined up evenly, then attach with the 4 mending plates.
Remember, you are working on the underside of the floor of the backboard.
Hint: Place something under the tapered edge of the mold to keep it firm and in place while drilling in the screws.
Now,flip the board over.
You should have a nice flat floor that tapers in the front.
This is so there is no sharp, one inch, drop off that the dog would step off of if you wished to move the backboard back for some extra work space.
Step 2:
Take 3 of the floor tiles and carefully stick them on the shelf part of the floor.
The tapered part of the wood will still show.
Step 3:
Attach the second shelf to the back edge of the floor.
Use the 4 Large Corner Braces to do this.

< This is what the underside of the floor piece will look like.
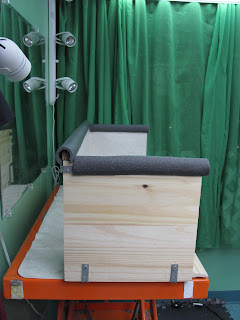
This is the side view >
Step 4:
Take your next 3 floor tiles and place them on the backboard.
Hint: There will be a little over hang of the tile.
You can cut it off with a utility knife.
Step 5:
Take the 12"x 12" piece of shelf and cover it with one of the floor tiles.
Attach the 12"x 12" board to the end of the backboard with 4 of the medium Corner Braces.
This is what it should look like. >
Repeat on the other end.
Hint: Step 5 is optional. If you like the ends of your table to be open, so that you can work from the sides of your table, ignore this step.
Step 6:
Take the Pipe Insulation, open the precut slit and place insulation over the sharp edge.
This Pipe Insulation is self-stick.
Repeat on all top edges.
This is the finished product.
It is amazing how much reducing my work surface, and the amount of space that the dog can back away, helps keep my back from hurting.
I like having the dogs right up close to me while I work on them.
If I am working on a larger dog, I can simply move the backboard all of the way back, to give me more table top space.
If I have a very large dog, I can take the backboard all of the way off of my table.
I also added a wire bin to the side of my backboard to hold my scissors and brushes.
Oh, and while I was at it...
I put up my Hydro Surge that I got from Hershey.
I'll let you know if I like it, and decide to keep it.
It was a very productive night.
Happy Grooming,MFF


this is a really good idea to keep the dog close to me! but there is one thing i'm wondering. I always have a hard time grooming a larger dog when the table is put against the wall. Don't you have to turn the dog every time when you want to work on the other side? For small dogs, i can easily turn them around but large dogs... do u have any tips/advise on that? i'm a new groomer so i would love to hear more from the experienced!
ReplyDeleteHi Tam,
ReplyDeleteCongratulations for becoming a groomer!
My backboard has saved my back. I will admit it is easier being able to move around the table, and my backboard does not allow me to do that. But, my back is more important. I feel safer having with my table against the wall and my backboard. Less open space for the dog to jump off of the table.
As for turning dogs, I have trained all of my grooms to turn when I tap the table and say "turn". Some dogs have caught on so well that just the tap is enough.
With large dogs I sometimes remove the backboard but still have my table against the wall. I have found that turning large dogs TOWARDS the wall helps them to turn more easily. They don't freak out (as much) or think that you are trying to take them off the table. An important tip is to move the dogs slowly, telling them that they are okay. Once they have completely turned, praise them. I am a very big advocate of praise. Praising them helps them feel comfortable.
One of the main lessons that I have learned over the years is that patience, gentleness, and praise works wonders, even with the difficult dogs.
Hope this helps you. :)
Lisa, MFF